Bursae are small sacs of fluid that cushion and reduce friction between your joints. When these sacs become inflamed, stiffness and pain results, which is referred to as bursitis.
Hip bursitis causes pain and discomfort along the outside of the upper thigh and is a very common hip problem. Those most likely to suffer from it are athletes who do a lot of running training like runners, cyclists and soccer players, anyone who has fallen onto their hip, or patients who have had a hip replacement or hip fracture surgery.
The main culprit when it comes to hip bursitis is the iliotibial band (ITB), a fibrous band of muscle that stretches over the hip and attaches just below the knee on the outside of the leg. When the bursa below it becomes inflamed, then it results in the pain of bursitis.
The treatment for relieving hip bursitis is rest, anti-inflammatories, ice and then stretching exercises that can improve the symptoms dramatically over just a few weeks. “Treatment involves a combination of stretching the ITB and strengthening the gluteus medius and gluteus maximus muscles [two of the three muscles that make up your bum], as well as the hip rotators,” confirms Bloemfontein-based physiotherapist James Wessels.
Find below the top four stretching exercises to help relieve hip bursitis pain. It’s important to keep these exercises within your range of pain. When it starts to hurt, ease off. As a general rule, the stretches should be done two to three times per day, and the strengthening exercises one to two times per day, or as directed by your doctor or physiotherapist.
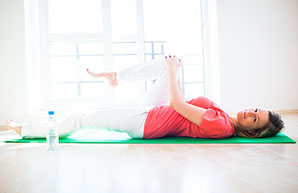
1. Two-part hip rotator stretch
Part 1
1. Lie on your back with both knees bent, feet flat on the floor.
2. Place the ankle of your affected leg on the opposite thigh near your knee, and use your hand to slowly push your knee away from your body.
3. Hold the stretch for 15 to 30 seconds, and repeat two to four times.
Part 2
Repeat steps one through three, however this time, during step two, slowly pull your knee towards your opposite shoulder until you feel a stretch at the back of your hip.
2. ITB stretch
1. Stand with your affected hip against a wall.
2. Put your weight on the hip that’s sore and cross the other leg in front of it.
3. Raise your arm above your head on the same side as the sore hip, and lean away from the wall, while letting the hip press against the wall.
4. Lean away from the wall, letting your affected hip press against it, until you feel a gentle stretch on the outside of your hip.
4. Hold the stretch for 15 to 30 seconds, and repeat two to four times.
3. Straight-leg raises
1. Lie on your side, with your sore hip on top.
2. Tighten the muscles in the sore leg to keep your knee straight.
3. Lift your top leg until your foot is about 30cm off the floor while ensuring your hip and leg stays in line with the rest of your body.
4. Hold your leg in the raised position for six seconds then slowly lower it.
5. Repeat this eight to 12 times.
4. Clamshell
1. Lie on your side with the sore hip on top.
2. Keep your legs together and bend both knees, then lift your top knee until your knees are about 20cm apart.
3. Hold your leg in this position for six seconds, then slowly lower your knee.
4. Rest for 10 seconds and repeat eight to 12 times.
IMAGE CREDIT: 123rf.com